Introduction
This application note describes the procedure to configure IKD 1 (I/O expansion board) connected via CAN bus to the Woodward easYgen series generator controllers or DTSC 200 automatic transfer switch controller. Instead of using LeoPC 1; now IKD Configuration Tool v1.000x can be used to configure IKD 1.
About IKD Configuration Tool
IKD Configuration Tool v1.000x (P/N: 9927-2094) is a tool to quickly configure an IKD for connection with the easYgen series or DTSC 200. It will check the parameterization of the IKD and allows to set it to one of the four different connection modes.
Prerequisites
The following items are necessary before installing the software:
- PC with Windows XP, or Windows 7
- To connect the IKD, one of the following is needed
- USB port on the PC:
- A USB/RS232 adaptor and a Woodward DPC cable RS-232 (P/N: 5417-557)
- A Woodward DPC cable USB/RS232 (P/N: 5417-1251)
Installation
The following steps needs to be performed for installing the tool
- Uninstall any previous installation of IKD Configuration Tool
- Unzip the *.zip file on your PC. You should get a directory named “publish”
- Run the “setup.exe” from this directory
- Follow the instructions given during installation
- After installation the directory “publish” can be deleted
Operation
- Connect the IKD to the PC as described above and power it
- Start the already installed IKD Configuration Tool
- Select COM port
- Connect to the IKD (press button “Connect”)
- Select CAN baud rate
- Press one of the four preconfigured mode buttons (“IKD 1 on Node-ID x”).
Settings will be transferred to the IKD.
Program Dialog Box
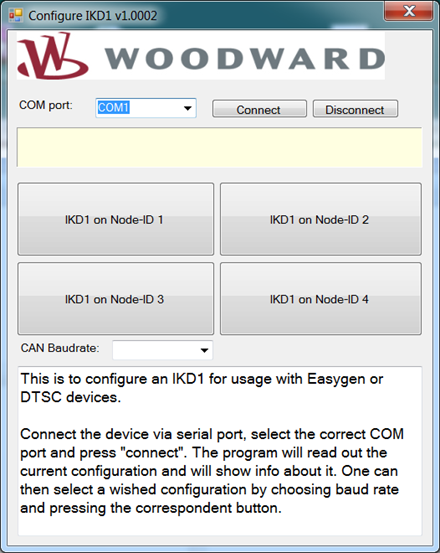
On start of the program, you should get the following screen:

There are the following fields, buttons and selectors available in the tool:
1. COM port:
This allows to select between all serial ports your PC is providing. If there is no serial port available, then this field is empty. Select the COM port to which the IKD is connected. (“COM1” for example)
2. Connect:
This button opens the selected serial port and tries to connect to the IKD. If successful, it will read out the data from the IKD but it won’t change any data on the IKD. It will populate the “CAN Baud rate” field with the CAN baud rate the IKD is currently configured. If the IKD is already configured to one of the four different CAN node-IDs usable for an easYgen, the corresponding button “IKD 1 on Node-ID x” will be colored green.
3. Disconnect
This button closes the serial port if it was opened. Must be used, if accidentally the wrong COM port was selected and connected
4. Status field (yellow background)
This shows messages about the status of the connection
5. IKD on Node-ID X
These four buttons have two functionalities:
a) After connecting, If the IKD is already configured to one of the four different CAN node-IDs usable for an EasYgen, the corresponding button will be colored green.
b) By pressing the button the program will configure the IKD to the selected node-ID and CAN baud rate. After that it will read it out for check.
6. CAN Baud rate
This has two functionalities:
a) After connecting it shows the currently configured CAN baud rate of the IKD.
b) It can also be used to select the CAN baud rate. For the easYgen configuration only 125 kBaud, 250 kBaud and 500 kBaud is permissible.

